


Boho Rainbow Classroom Reveal
***This post contains affiliate links for Target, Walmart, and Etsy. By purchasing an item using these links, I will receive a small commission on your purchase.***
Did anyone else just exhale?!
When I redesigned my classroom this year with more muted, natural colors and a boho rainbow theme, that was my exact goal . . . for my students and me to walk in and immediately feel calm, peaceful, and inspired.
It’s been over TEN years since I completely overhauled my classroom decor and color scheme, and it’s been a much-needed change after the challenging past year and teaching virtually. I am overjoyed to be returning to my old teaching position as a part time gifted and talented and enrichment teacher for K-3rd grade! I’m beginning year 18 with a full heart and head full of new and exciting ways to engage my students.
I hope you love my new classroom theme as much as I do! An EXTRA special thanks to Melanie from Schoolgirl Style for inspiring this transformation and providing so many beautiful elements!
Let’s take a tour to see all the details!
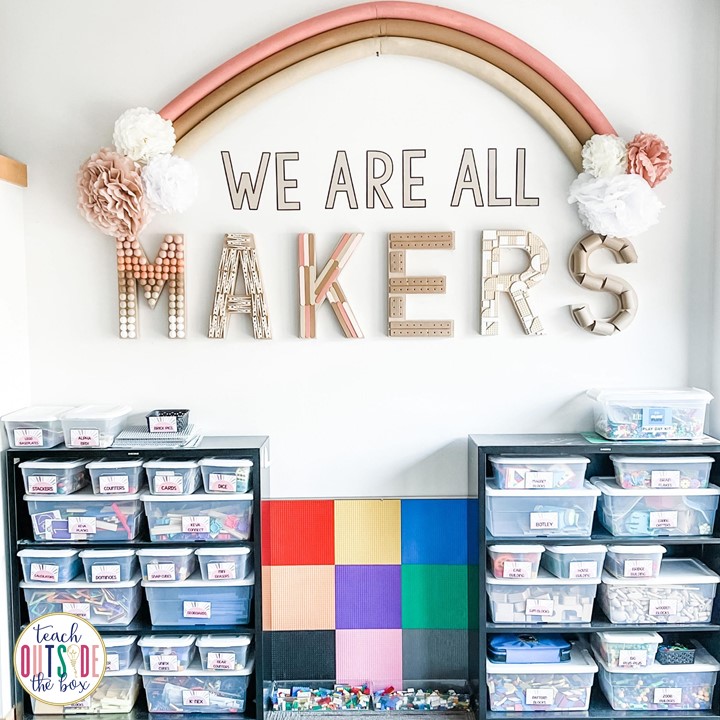
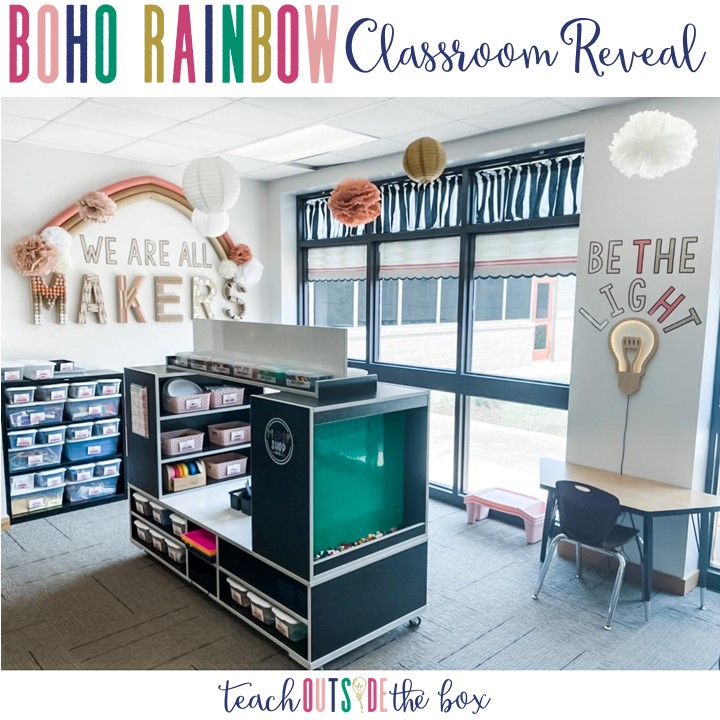
My favorite centerpiece of my classroom has to be my “We are all Makers” wall. These 16″ paper mache letters are from Hobby Lobby, and Michael’s and JoAnn’s also have similar styles that are smaller. We decorated the letters with a variety of Makerspace materials such as felt balls from Etsy, painted popsicle sticks, and LEGO. We used hot glue to adhere all the materials.
The rainbow on top is made of pool noodles with tissue poms for the clouds. We painted white pool noodles with two coats of acrylic paint (teddy bear, coffee latte, and crushed coral), but it flakes very easily, so if I did it again, I’d probably wrap them with fabric or paper instead. To hang the rainbow on the wall, we zip tied the ends together, then stuck lots of wooden skewers through the back side to hold the three noodles together and help them keep an arched shape. We hung the full piece on the wall by resting it on top of one long screw in the center, plus command hooks on the bottom that were hooked through the back of the zip ties and adhered to the walls. To say it was a process is an understatement, (it pretty much took us all day to figure out!) BUT I’m so pleased with how it came out and I think it adds so much joy to our learning space!
The labeled bins on the shelves are Sterilite are from Walmart in small and large sizes, and I made the labels using Schoolgirl Style’s Boho Rainbow U-Print collection.
We made the LEGO wall in the center several years ago using Strictly Briks baseplates. My husband, Andy, glued them to a sheet of plywood, added a metal frame, and drilled it into the wall. If you’re interested in adding a LEGO wall to your classroom, I also recommend Creative QT’s play wall panels.

Here’s a view of the front of my classroom, and this gorgeous 5 x 7 boho rainbow rug from Schoolgirl Style ties it all together so beautifully! The “Keep Shining” bulletin board pieces on the black pocket chart are also sold by Schoolgirl Style.

I absolutely love how my Engineering Design Process bulletin board came out! These posters are FREE for my email subscribers in two different color schemes. The rainbow border and black and white scalloped border are both from Schoolgirl Style. The background is Pacon fadeless paper in white shiplap.

I made these paper fans using cardstock from Hobby Lobby! Here’s a great video tutorial from my friend Ashlyn from The Creative Classroom for how to make them. (You’ll need 3 sheets of cardstock per fan) The die-cuts in the center are hot glued on and are from Schoolgirl Style.

Here is my Multiple Intelligences, or “Smarts” board that we’ll refer to all year long! At the beginning of the year, my students take an informal survey to identify their top 3 smarts. We connect all our yearly activities to our Smarts and consistently work on improving all of them. These Multiple Intelligence posters are available in my TpT shop in three color schemes and include both lower and upper grade versions.


“RISE” is our schoolwide mantra and stands for “Respect, Integrity, Self-discipline, and Excellence.” I made the sun using Pacon tan fadeless paper and made the RISE letters in Powerpoint, printed on light pink cardstock. The toilet paper rolls are painted with acrylic paint (teddy bear, coffee latte, crushed coral, and seashell pink) and I adhered them to the wall with command strips.

I happened to spot this beautiful handmade lightbulb sign from AJ’s Fine Creations on Etsy and simply had to have it! It’s remote controlled with several different settings. If you’re interested in ordering one, use the code TOTB2021 for 10% off! I made the “Be the Light” letters in PowerPoint and printed on colored cardstock. (Font is KG Sorry Not Sorry bold)


I love, love, LOVE my wall of windows in my classroom! They’ve always been my favorite part and I feel so fortunate to have so much natural light in our learning space. To keep our room cooler, I added black and white striped curtains across the top. I made the shades underneath by layering four different borders from Schoolgirl Style (simply boho wood grain, coral stripes, gold dots, and black and white scallops)

These “I am” Maker Posters are brand new and are perfect for my cabinets! They’re available in my TpT shop and you can print on any colored paper to match your classroom theme.


My lockers are exclusively used for storage and are jam-packed with all the STEM and Makerspace materials! These lightbulb die-cuts are from Schoolgirl Style’s Boho Rainbow U-Print collection.

Here’s a closer look at my shelf organization!
For a full blog post on Makerspaces, including a list of all my recommended supplies, check out this post:
So You Want to Start a Makerspace?

This incredible “Maker Shop” play and storage table was designed by my talented husband and built by a local manufacturer. It has a dry erase tabletop and header board, magnetic dry erase wall on one end, and LEGO wall/green screen on the other end. It also perfectly stores STEM Bins on the top shelf! Prior to the pandemic, we had custom Maker Shops available for order, however, our previous manufacturer had to pivot production and we are hoping to find another partner soon. Stay tuned!
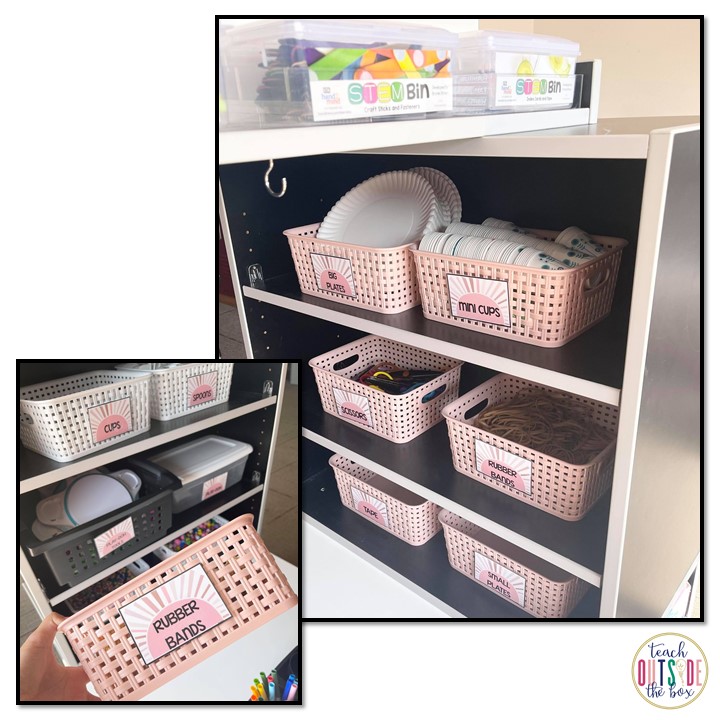
Here’s a closer look at the interior storage. The pink and white baskets are available at Hobby Lobby and Target, and the labels are from Schoolgirl Style.

The dry erase pockets on the left are where I will write our weekly objectives or “I can” statements for each of my enrichment classes. These black wall trays are hung right next to my door to hold all my essentials. Rainbow die-cuts are available HERE.

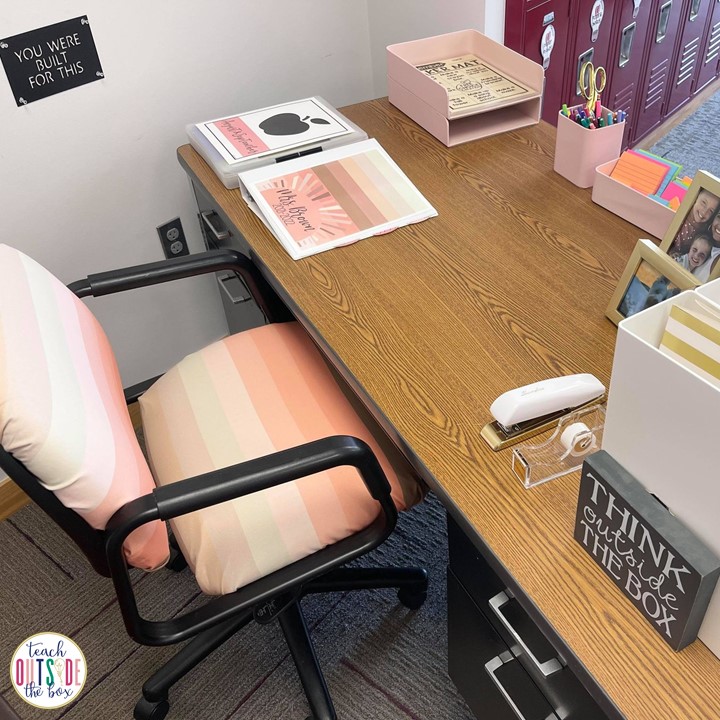
This gorgeous desk transformation was ALL my 10 year old daughter, Ellie’s idea! We used fadeless Pacon paper in white shiplap and we attached it to the desk with Scotch tape. We also made the yarn tassel garland using this tutorial from The Creative Classroom.

These plastic files are where I’ll keep all my weekly copies and read alouds for each of my classes. The gold and white file folders are from Hobby Lobby and rainbow die-cuts are from Schoolgirl Style.
I created my planner cover with Schoolgirl Style’s digital wallpaper.

My dad helped me recover my office chair for the second time (he’s the best!), and I love how it turned out! I custom ordered the fabric from Spoonflower using Schoolgirl Style’s digital boho wallpaper design.
Here’s how we did it:
You’ll need about 1.5 yards of fabric, a staple gun, safety pins or duct/packing tape, and tools to take the screws out of your chair.
1) Unscrew the back of the chair to remove from the frame and remove the plastic cover from the back (mine just pulled off).
2) Wrap your fabric around the seat back and use a staple gun to staple it around.
3) Put the cover back on and reattach to the chair.
4) Detach the bottom (seat) of the chair. I didn’t have to take off the chair legs because I could get to the seat without taking it off.
5) Wrap the fabric around the seat and either staple or use safety pins or strong tape to secure it underneath. (It can be messy because NO ONE sees the underneath part anyway!)
6)Screw the top and bottom parts of the chair back together.
That’s it!

I also purged tons of my old files from my monthly project cases and added these new boho covers.
To read more about how these are my FAVORITE classroom organizational tool, check out this blog post:
Kiss Your Binders and Hanging Files Goodbye!

I mean, is there anything more satisfying than shiny new school supplies?! These black table caddies keep basic student supplies organized and the pink cups inside are from Hobby Lobby. The black tumblers were in Target Dollar Spot several years ago.

I updated the color scheme of this Maker quote poster and hung it right outside my classroom door. This poster is a FREE download for my email subscribers and also includes a bright color scheme. I ordered this 20″ by 30″ size from Walgreens. Make sure to check their site for great coupon codes!
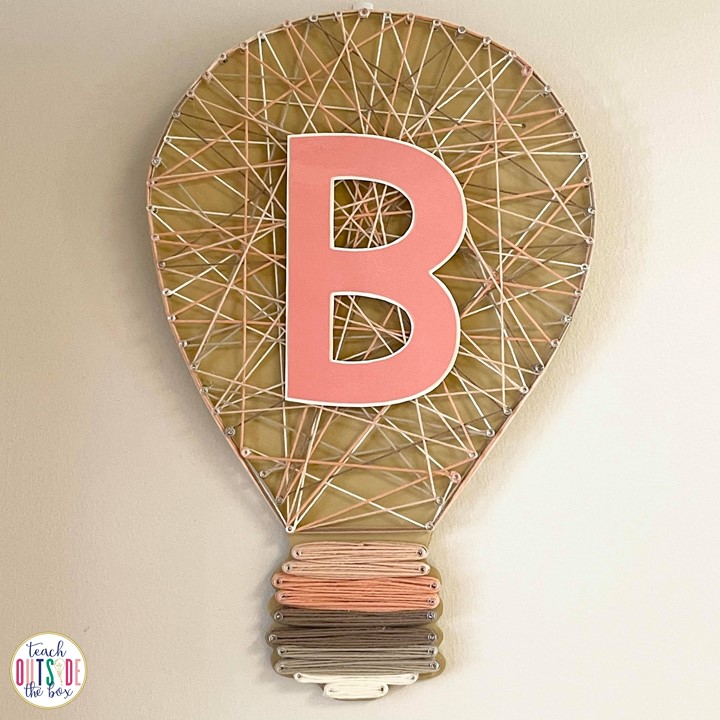
Ellie and I used yarn and thumbtacks to deck out this wooden lightbulb that hangs on the opposite wall outside my door!

It’s all about the little details, and I LOVE how these little lightbulb vases from Hobby Lobby turned out. I placed them along my window sills so they can be seen from the hallway. (Felt pom poms are from Etsy)
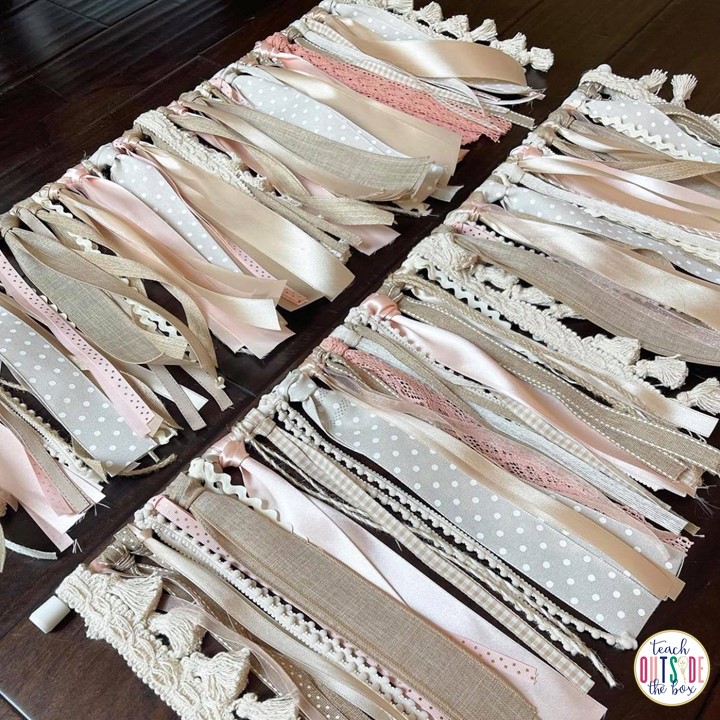
These ribbon curtains were all my teammate, Kristi’s, idea! (We’re doing the same theme this year!) It was so fun to pick out all the different sizes and textures of ribbons and is a great option if (like me) you avoid sewing at all cost.
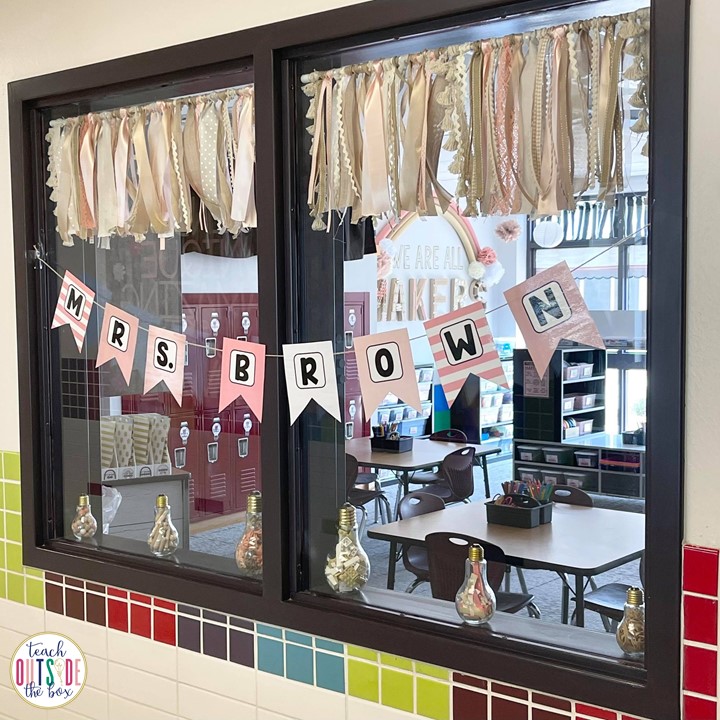
Here’s how it all came together outside my hallway windows. (Banner was made in PowerPoint using these digital papers.)
Sooooo what’s your favorite part?! I can’t wait to hear what you think, and hope you love it as much as I do!
Wishing and praying for a happy and healthy year for all of us!
***This post contains affiliate links for Amazon, Target, Walmart, and Etsy. By purchasing an item using these links, I will receive a small commission on your purchase.***


